Friday, June 10, 2011

Bruschetta

Bruschetta is one of my favorite things to make and to eat. It is simple, fresh, and a constant crowd pleaser. Since moving into our house we have a small herb garden. Somehow our basil is growing out of control (good job Farmer Kenny) so I am constantly thinking of ways to use it. I used to use the tubes of basil but find that fresh tastes much better, especially when it's growing in your back yard.

Ingredients:
10-13 fresh basil leaves (depending on their size)


1 container of cherry tomatoes
Freshly grated Parmesan cheese


1 loaf of French bread
Olive oil
Salt
Pepper

1. Cut the stems off the basil.


2. Chop the basil and put into a bowl.


3. Wash the tomatoes. Slice them into fourths and put them in the bowl with the basil.


4. Grate Parmesan cheese over the tomatoes.


5. Stir to incorporate. Add salt, pepper, and olive oil and stir again. Top with the remanding Parmesan in the grater.


6. Now for the toasts. Set the oven to 250 degrees F. When you buy your loaf of bread sometimes they will slice it for you in the bakery. I would suggest doing this if you're in a time crunch. Make sure it's sliced thick. When I went to buy my bread no one was in the bakery so I had to slice it myself. Slice the loaf in half to get it started.


7. Slice the bread into 1 inch slices. Make sure to use a serrated bread knife.


8. Line 2 cookie sheets with aluminum foil. Place the bread on the cookie sheets.


9. Fill a bowl with olive oil, salt, and pepper. Brush on the seasoned olive oil with a non-stick brush (like the one picture below).


The bread should look like this.


10. Toast the bread for 17 minutes. Place on a platter.


11. You can make the toasts ahead and serve them cool or toast closer to the time of your party and serve them warm. Put the bowl of tomato mixture out next to the toasts with a spoon. This way your guests may spoon their own amount of tomatoes on the toast. If you do it ahead of time the bread gets a little soggy.

-Posted using BlogPress from my iPad

Turkey, Cream Cheese, and Pickle Bites

This recipe is one from my parents. They used to make this all the time when they were entertaining or bringing an appetizer to a party. The combination may look odd but honestly tastes delicious! I've had many people who don't care for pickles love this dish! I think it's the cream cheese. :)

Ingredients:
I jar of Kosher pickle spears


1 pound of deli turkey sliced thick (the "sliced thick" part is important!)
2 containers of softened cream cheese (you won't use all of the second package but you'll need more than one). My mom swears non-fat or reduced fat does not work as well, but you can try it.


Directions:
1. Slice 5-6 pickle spears in half. Pat them dry with a paper towel.


2. Smear a large amount of cream cheese on a piece of turkey. If the turkey begins to rip try doing 2 pieces at once. That means your turkey is too thin. Adding a little bit more cream cheese helps as well.


3. Place a pickle length wise with the turkey. If it's too short add another and trim it to fit.


4. Roll it up and place it seam side down on a cookie sheet. When you're done it should look like this.


5. Depending on how much time you have, place in the fridge or freezer. The colder the pickle roll ups are the easier they are to slice. You should do this for a few hours and can even leave in the fridge overnight.

6. Slice the roll ups about 1 inch thick. Cut off the "ugly ends" as my mom calls it. Don't worry if you feel like you're wasting a lot... I save the ugly parts to eat later. Here is what my pile looked like.


7. Place the pretty, sliced pieces on a platter. Cover and keep in the fridge until you're ready to serve. You can serve with toothpicks or eat them with your fingers.


Posted using BlogPress from my iPad

Wednesday, June 8, 2011

Top 10 Kitchen Tools

One of my favorite things to do is wandering around William Sonoma, Crate and Barrel, or any kitchen section of a store. I am a sucker for cute kitchen towels and unnecessary kitchen gadgets. Since registering for my wedding (and looking on others gift registries) have noticed that there are so many interesting and seemingly useful kitchen gadgets and tools in the stores. For example, the avocado pitter and peeler. It looks cute and functional in the store... You think "I will definitely use this when I make guacamole!". But when you need to prep an avocado are you really going to fish through your random kitchen drawer (c'mon... Everyone's got one) to use it? 9 times out of 10 I don't... I always forget I have those specific tools. And then I find them a week later and say "Ohh... I could've used that last week for the guacamole!"
So in order to avoid these situations and keep it simple...
Here is my list of the top 10 tools I use in my kitchen almost every day.

1. Hard cheese shredder (Oxo)


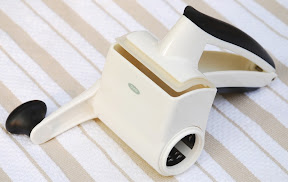
One of the many things my dad taught me was the importance of fresh parmesan. Instead of buying parmesan in a can (I'm not sure how they can still call it parmesan) opt for buying fresh blocks of it. If you are a Costco member you can get a great deal on it. You need a great cheese shredder for hard cheeses. I have had multiple shredders and nothing is better than the Oxo brand!

2. Non-stick tongs (Williams Sonoma)


We received these tongs as a wedding gift and could not be happier with them. I use them when flipping meat over, tossing salad, and serving food. They are extremely functional and helpful; I love that they are non-stick so I don't have to worry about ruining my non-stick pans and the work just as well with regular pans. Kenny always says that we need to go buy 2 or 3 more of them just in case... That's how much we use them.

3. No-slip cutting board (Martha Stewart @ Macy's)


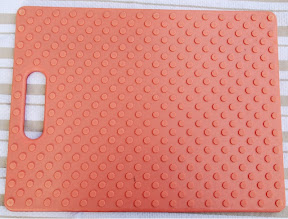
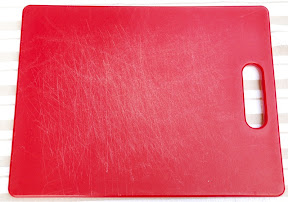
Everyone needs a great cutting board in their kitchen. This cutting board is wonderful because it has a ribbed side that keeps it from slipping while you cut. It is also made out plastic opposed to a wood, like bamboo. That makes it more functional when cutting meats, veggies, or herbs. I am hesitant to cut meat on a wood cutting board. This one is a heavy weight and large enough to cut and place your food on it.

4. Splatter screen (Oxo)


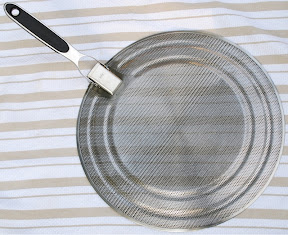
This tool may seem unnecessary but if you ever use a skillet it's not! It's great for keeping your kitchen area clean. Kenny and I had a friend make us dinner (I promise I appreciated it) but left our kitchen with a film of grease all over the counters, walls, and even the photos on my memory board! It was nasty. Sadly this houseguest (who will go unnamed) opted not to use the splatter screen. Its purpose is to keep the grease, oil, and juices in the pan but allows the food to cook like it was not covered with anything.

5. Gallon size plastic baggies


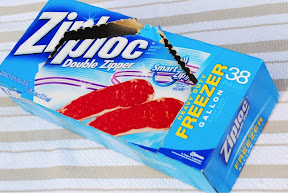
The use of a plastic baggie is not only to store food, they have many wonderful functions. I cannot take credit for this one; it's another trick my dad taught me. When I make sweet potato fries or want to marinate food I use a gallon size baggie. This way you can toss all of the food and coat it evenly. It cleans up easily and is inexpensive. I also use them like piping bags when filling deviled eggs or icing cup cakes. By snipping of one corner it works just like a piping bag. You can even put the piping tips into the baggie if you want a fancier look. This is one of the many great products I get at Costco and I never run out.

6. Assorted sharp knives (Kitchen Aid)


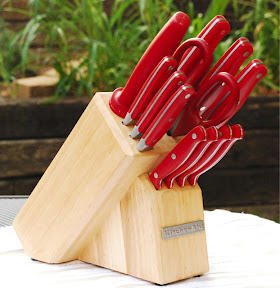
A good set of knives is essential in your kitchen. There is nothing more frustrating to me than attempting to prepare food with dull, (and for lack of a better word) crappy, knives. I purchased my block of knives from Target for around $80 and do not regret any penny! The key is to sharpen them or get them sharpened when you notice they are getting dull. The block of knives I bought came with a sharpening tool that Kenny loves to use. Nice knives make preparing food much easier and (dare I say it?) fun. One tip... In order to take care of them you should hand wash them opposed to putting them in the dish washer. Otherwise don't bother getting them at all. :)

7. Nonstick slotted spoon (Williams Sonoma)


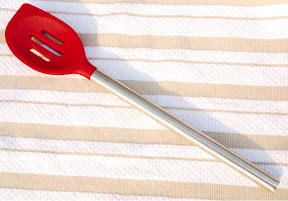
This is the most amazing spoon! If I could only have one... This is it. Look at the tip of the spoon; there is an angle at the top that allows you to get into the creases and corners of the pan. Also, I prefer non-stick because in the heat of the moment while cooking its easy to use the wrong spoon and ruin a pan (Am I right, Mom?) By using non-stick I know I wont ruin any pan. You just need to make sure to keep it away from the burner. :)

8. Nonstick spatula (Martha Stewart @ Macy's)


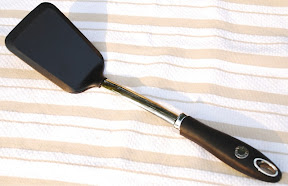
This is the one time I did not prefer an Oxo brand (gasp!)
We have two Oxo spatulas and they are way too flimsy to get anything flipped off of a pan. That drove me crazy! So I was on a mission to find a sturdy spatula. After lots of searching I found this spatula; it's sturdy, inexpensive, and easy to use.

9. Nonstick sauce brush


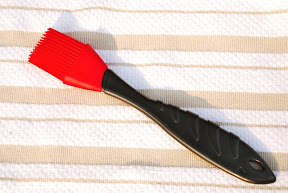
I am a big fan of olive oil but when making toasts or prepping meat I always seemed to pour too much on (BTW 1 tablespoon of olive oil is around 130 calories... Yikes!). By pouring the oil or marinade into a small glass bowl (my next kitchen tool) and using the sauce brush I have much more control over how much I use and where it should be applied. Score for controlling caloric intake!

10. Assorted glass bowls (Williams Sonoma)


This was another wonderful registry gift (Thanks, Ryan!) that we use daily. The set comes with 9 bowls ranging from about 1/8 of a cup to one large enough to marinate meat or make a salad. Kenny uses them when making specific spice blends. I like using them when prepping food so the cooking process is much easier and fun! They are dishwasher safe and easy to clean.

Hope you found this beneficial! I will be on the lookout for more new ideas for my blog.
Thanks for reading,
Libby

- Posted using BlogPress from my iPad


Tuesday, June 7, 2011

Panko shrimp tacos and spicy tomato cucumber salad

I had never used panko bread crumbs on shrimp until tonight. It added a great crunch to our tacos. I also changed up the tomato cucumber salad by making it spicy. This dinner was thrown together last minute and turned out very well!

Ingredients:
For the shrimp:
1 lb. uncooked shrimp
1 package panko bread crumbs
3 eggs
2 cups all purpose flour
Emeril's Essence seasoning
1/2 yellow onion (sliced)
1 green bell pepper (sliced)
2 cloves garlic (minced)
Vegetable oil
Salt
Pepper
Wheat tortillas

For the spicy mayo:


Ginger (powdered)
Green Tabasco sauce
Lime juice
Ground cayenne red pepper
Chipotle chile powder
Mayo (made with olive oil)

For the salad:
5-6 Roma tomatoes (diced)
1/2 cucumber (diced)
Salt
Pepper
Ground cayenne red pepper
Olive oil
White wine vinegar
Apple cider vinegar

1. Start by peeling the shrimp. Pat them off with paper towels. Season them with salt, pepper, and Emeril's Essence. If you dont have Emeril's Essence any seasoned salt will do. Place them in a covered bowl in the fridge.


2. Crack the three eggs into a small bowl and whisk with a fork. Place about 1-2 cups of the flour in a separate bowl and the panko bread crumbs in another bowl. Drudge the shrimp in flour, then egg, the panko crumbs and place on a plate. Shake off any excess while going through the process. I
keep one hand clean in case I need it.


3. While I was preparing the shrimp, Kenny was cooking the peppers and onions. Heat up a small skillet and add about 1 tablespoon oil. Prepare the onions, peppers, and garlic.


4. Place the peppers and onions in the hot pan with the oil. Cook for about 6-8 minutes on medium high. They should look like the photo below.


5. Remove the peppers and onions and add some oil and the shrimp. Cook on each side for 2 1/2 minutes.


After Kenny flipped them he added a little beer to the pan to cool it off.


6. Add the onions and peppers back to the pan. Add the garlic and stir in. Let cook for about 1 minute.


7. To make the cucumber tomato salad, combine all ingredients in a bowl. Only add about a dash of oil and the vinegars.


8. To make the spicy mayo, put about 1/2 a cup of mayo in a bowl. Add the ingredients and taste frequently to control how spicy you like it. Kenny added extra hot sauce to his, being the spicy-food-loving Texan he is.


9. You can either spread the mayo on the tortilla or top the shrimp with it. Either way it is really yummy!


Posted using BlogPress from my iPad

Corn Salsa

This recipe is from my good friend, Caroline Credille. Her mom would make this recipe a lot! I have adjusted it to my own style; adding olive oil and lime juice. It is originally from Weight Watchers and was zero points (without the avocado). Is is ALWAYS a big hit and is extremely easy as well as healthy... Enjoy!

1 can yellow corn (drained)
1 can black beans (drained)
2 green onions (chopped)
1 container of cherry tomatoes (cut into 4ths)
1-2 avocados (diced)
White wine vinegar
Apple cider vinegar
Extra virgin olive oil
1 tbsp lime juice

1. Put corn, green onions, and tomatoes in a bowl.


2. Stain the black beans; let most the liquid drain out. I left my beans in the strainer for about 5 minutes; shaking occasionally. Add to the bowl.


3. Add a splash of olive oil, white wine vinegar, and apple cider vinegar. Be careful not to add too much; the vinegars can overpower the taste. Stir and add salt and pepper.


4. Dice the avocado; add this last. Make sure the avocados are ripe. Here is a photo of ripe avocados. Serve with chips and enjoy!


Posted using BlogPress from my iPad